Yay! Ketemu lagi! ha ha..:D Kali ini kita akan belajar bersama kak
KeMotaku membuat ilustrasi vector dengan Adobe Illustrator dengan tema Super Girl untuk keperluan vector stock. Tentu saja masih alakadarnya seperti biasa... Yah maklumlah, ilmu yang saya punya ga banyak2 amat.
Okeh, langsung kita mulai saja ya! Tutorial dimulai!
Yay! See you again! ha ha ..: D This time we will study together bro KeMotaku creates vector illustrations with Adobe Illustrator with the theme Super Girl for vector stock purposes. Of course it's still as common as usual ... Well you know, the knowledge I have is not very much.
Ok, let's start right away! Tutorial starts!
♦
Step 1
Pertama2 open new document dulu, kemudian import sket kamu. File> place> pilih sket yang mau kamu buat vectornya. Atur posisi dicanvas dan lock pada layer. Kemudian buat new layer diatasnya. Sip!
First open the new document first, then import your sketch. File> place> select the sketch you want to make the vector. Adjust position and lock on layer. Then create a new layer above it. OK!

♦
Step 2
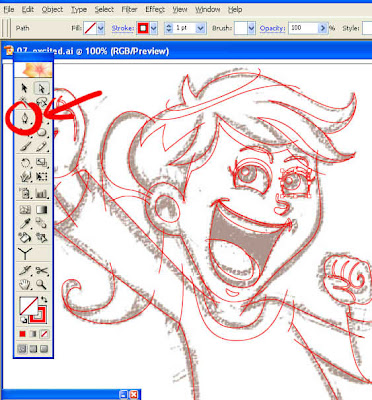
Sekarang kita mulai trace (jiplak) sket tadi dilayer baru ini. FYI: Dalam project kali ini seperti yang kalian lihat pada gambar, saya membuat object per bagian2 (lihat tanda panah merah). Dengan satu tujuan agar nanti memudahkan kita untuk mengradasi warna sesuai arah cahaya yang diinginkan. Yah... kira2 begitulah ha ha... :D
Now we begin to trace the sketch this new layer. FYI: In this project, as you can see in the picture, I made objects per section (see the red arrow). With one goal that will make it easier for us to direct the color according to the desired direction of light. Well ... that's about it ha ha ...: D


♦
Step 3
Nah, begini nih hasilnya setelah diberi gradasi warna. Tanda panah adalah arah gradasi dari warna terang ke gelap. FYI: Default gradasi warna di Illustrator adalah hitam ke putih. Jadi pilih warna sesuai kebutuhan aja. Bisa juga disimpan dipalet warna dengan mengklik tombol new swacth (lihat lingkaran merah).
Well, here's the results after being given a color gradation. The arrow is the direction of gradation from light to dark colors. FYI: The default color gradation in Illustrator is black to white. So choose the color according to your needs. Can also be saved in the color palette by clicking the new swacth button (see red circle).


♦
Step 4
Saatnya menambah detail dengan membuat shadow.Lihat seperti pada contoh. Pada kasus ini, kita akan buat shadow pada bagian dada dan sekitar pinggul. Tidak perlu presisi pada bagian tepi object, yang terpenting area badan yang akan diberi shadow.
It's time to add detail by making shadow. Look like in the example. In this case, we will make shadows on the chest and around the hips. No need to be precise on the edges of objects, the most important area of the body to be shadowed.

♦
Step 5
Kemudian klik object badan, lalu tekan ctrl+c kemudian ctrl+f. Itu adalah shortcut untuk mengcopy object kemudian menggandakan object tepat diatas object tersebut.
Then click the body object, then press ctrl+c then ctrl+f. That is a shortcut to copy an object and then copy the object directly above the object.

♦
Step 6
Klik copian object badan tadi, sembari menekan shift tekan object shadow. Kemudian tekan intersect pada pathfinder kemudian expand (lihat lingkaran). Bisa juga langsung tekan alt+klik pada tombol intersect.
Click copy body object earlier, while pressing shift, press object shadow. Then press intersect on the pathfinder then expand (see circle). You can also directly press alt+click on the intersect button.

♦
Step 7
Setelah itu pilih gradasi warna yang lebih gelap dan gradasikan sesuai arah panah dari terang ke gelap. Untuk mengatur posisi object supaya tidak menutupi object yang lain, tekan ctrl+[ sampai posisi object tepat di atas object badan. Bisa juga klik object>arrange> send backward.
After that choose a darker color gradation and gradate in the direction of the arrow from light to dark. To adjust the position of an object so as not to cover other objects, press ctrl + [until the object's position is directly above the body object. You can also click object> arrange> send backward.

♦
Step 8
Ulangi membuat shadow seperti step2 sebelumnya adn gradasikan sesuai arah panah :) FYI: Sebenarnya bisa juga mengkombinasi dengan blending dan transparasi pada object shadow, tapi karena ini untuk keperluan vector stock, jadi semua object tidak boleh diberi efek apapun. Semuanya harus normal tanpa efek, blending dan transparasi. Agar tidak terjadi masalah saat di save ke format eps8.
Repeat making shadows like the previous steps and then move them according to the direction of the arrow :) FYI: Actually it can also combine with blending and transparency of the shadow object, but because this is for vector stock purposes, so all objects should not be given any effect. Everything must be normal without effects, blending and transparency. So that there are no problems when saved to eps8 format.


♦
Step 9
Sekarang waktunya memberi highlight. Buat object highlight dan gradasikan ke warna yang lebih terang dan mengkilat (karena ini kostum superhero).
Now it's time to highlight. Create the highlight object and gradate it into a brighter and shiny color (because this is a superhero costume).

♦
Step 10
Ulangi step2 seperti membuat shadow bila diperlukan. Jangan bosen2 ya, karena memang dibutuhkan kesabaran dan ketelitian :)
Repeat the steps like making shadows when needed. Don't be bored, because patience and accuracy are needed :)

♦
Step 11
Tambahkan sedikit pemanis sebagai background dan...
Add a little sweetener as background and ...

Voila! Vector stock siap dihidangkan! :D
Voila! Vector stock is ready to be served! : D

Sebelum diupload, pastikan dan cek lagi bahwa tidak ada open path dan stray object yang tertinggal. Sebenarnya ada cara lain untuk mewarnai dengan live paint object di Illustrator. Kita akan coba praktekan dilain kesempatan, ok!
Before uploading, make sure and check again that there are no open paths and stray objects left behind. There are actually other ways to color with a live paint object in Illustrator. We will try to practice the other time, ok!
Wassalam :)


 Selalu berlatih dan terus berkarya!!


 Selalu berlatih dan terus berkarya!!


